
Version: June 13, 2004
|
|
Version: June 13, 2004 |
by Rob Lomas
|
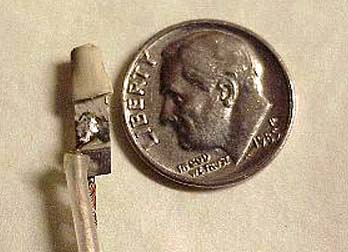
(this article is a work in progress- please excuse the roughness of this draft) I find that there is an ever increasing interest in electrically recording cylinder records, either for archiving or for sharing with others over the web. The best solution for quality archiving is to use one of our ACT line of professional cylinder pickups, which are built around the Stanton 500 cartridge and outfitted with custom styli from our own shop. For many however, the investment in one of these professional pickups is just not a possibility. With those people in mind, we have been developing a less expensive alternative which we plan to unveil in early 2001. The hundreds of experiments we have performed have yeilded many possible methods of electrically playing back (and thus recording) vintage cylinders and we would like to share a very simple and inexpensive design which can be used as is or adapted to fit your abilities. Background...Before we get into the actual product in question hovever, we would like to give you a little background on the main element which is used - a piezo crystal. Many inexpensive turntables of the 1950's and 1960's employed crystal pickups because they were inexpensive to produce, had a high output level which minimized the requirment for preamplifiers and thus simplified the amplifier circuitry. The poor low frequency response and other shortcomings caused these pickups to fall out of favor as the publics demand for better fidelity increased. The piezo element itself is a special type of crystal which when subjected to presure gives off an electrical charge. Pushbutton ignitors on gas grills, lanterns, etc all use piezo crystals. When struck the piezo can create enough electricity to create a spark. On to the project...We need only a handful of components to make a usable electric cylinder pickup. The fidelity of the pickup will depend on the quality of your original Edison reproducer, which should be rebuilt with new gaskets for optimum performance. What you will need:
With the exception of the rubber hose all items can be purchased at your local radio shack. If you do not have any rubber hose laying around, you can substitute a piece of heat shrink tubing, silcone, etc but the neoprene hose will provide the best protection for your reproducer. We begin by cutting a sliver from the piezo element approx 1/8" wide. Tin both the metal side and the crystal side of the of this sliver. Carefully solder the hot (insulated) wire to the crystal side of the piezo element. Solder one end of the 1Kohm resistor to the metal side. Solder the other end of the resistor to the ground wire. Cut a piece of heat shrink tubing (approx. 1/2 long), pass it over the piezo, covering the solder connections, resistor and end of the connecting cable. Use a lighter, match, etc to shrink the tubing snugly. Slip the piece of neoprene hose over the end of the piezo element, leaving the hose overhang approx. 1/8". While the pickup will work without the tubing in place, the quality of sound reproduction is greatly diminished. Ready to test...Plug the wire into your amplification source, i.e. mic input. Be sure the volume control is at minimum. Lightly tap on the end of the element while gradually increasing the volume control. A loud clicking should be heard while you are tapping. If you hear the tapping you're all set. I like to use RadioShacks amplifed speaker as a buffer & preamplifier for many of my recordings, and its a great way to test the pickup out. |
 |
 |
|
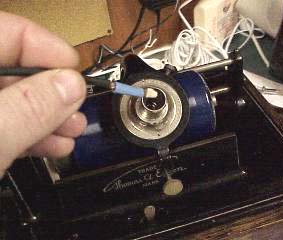
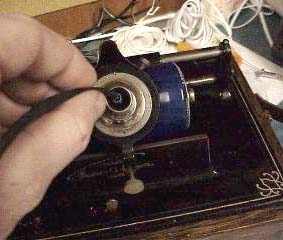
Wind up your phonograph, put on your favorite record and (without a horn on the machine) lower the reproducer and begin playing. Carefully pass the piezo element through the neck of the reproducer until the tip touches the center of the diaphragm. Voilà! you should now be hearing your record through your playback system! As described, you will have to hold the element in place for the duration of the recording. You can come up with a mounting method yourself or wait for the next installment which will detail a method we use here. In the meantime, have fun recording and sharing your recordings with others! |

| Visit Rob Lomas' site: | ||
