Version: May 9, 2022
 |
|
Version: May 9, 2022 |
by Jan Derogee, 2021
|
Making a "stylus" from what? The stylus is the blunt thingy glued onto the membrane of the reproducer, it rides the groove of the (wax) cylinder. Now these can be made of various materials, but in essence it comes down to something really hard (so it will last for a long time) and really smooth (so it doesn't damage the cylinder). But these days the most common ones are made from sapphire and glass, where sapphire is the best choice but relatively expensive and glass is the cheaper option which you can even make yourself. The hardness of sapphire is 9 on a scale of 10 (where 10 equals the hardness of diamond, and 1 equals the hardness of chalk). Regular household glass (soda-lime) can have a hardness of 6 but borosilicate glass has a hardness of 7.5 and is therefore the better choice if you want to make you own stylus from glass. Although you can use regular glass, it will work and it most certainly won't last very long, eventually your regular glass stylus will become flattened and sound reproduction will suffer and if you keep using it you will eventually damage your cylinders. So if you want to make your own stylus out of glass then you really need to use borosilicate glass. Now, where do you find this type of glass? Well, the usage for this type of glass lies in its low thermal expansion properties. Meaning that it will be able to resist heat better then regular (soda-lime) glass, because when exposed to great temperature differences, regular glass will easily crack. Borosilicate glass can withstand great heat differences and therefor can be used to make laboratory equipment (for example: beakers, testtubes, tubes for connecting hoses, etc.) but you may also find it in your home already. Borosilicate glass is used for plates and dishes that you might put in the oven. Pyrex is a brand famous for it's heat resistant plates and dishes. They made these out of borosilicate glass for many decades in the past, unfortunately if you buy a new Pyrex plate or dish today, it no longer automatically means that you get a product made of borosilicate glass. That is because today they produce products that consist of "ordinary" tempered glass, now this certainly does have improved properties over regular glass, but it still is inferior to borosilicate glass regarding thermal expansion and hardness. But, since it is cheaper to make AND profit is important AND many customers will never even know the difference... Anyway, some wine or other drinking glasses may be made of borosilicate glass, simply because it is more durable and therefore can be made thinner. Although the chances that you actually own such a type of drinking glass is very small and if you do... it probably was relatively expensive so how willing would you be to smash it to pieces? So, borosilicate glass is the type of glass that you need. You may purchase tiny thin rods online (it can be interesting to browse through the inventory of your local chemical laboratory shop) or smash your wine cabinet and oven dishes to pieces. But... don't smash them yet, first examine them to see if these items are actually made out of borosilicate glass. Because not many glass items simply aren't (since it's more expensive), but you might be lucky so it can be worth a try to find out. And even if you do know for certain which type of glass you have it still is a fun experiment. And this is a hobby project, so fun is an important part here. |

|
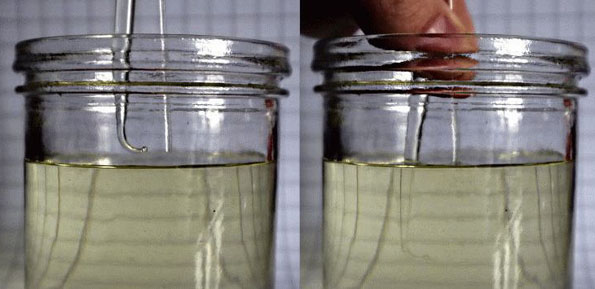
The easiest way to check is by submerging it into vegetable oil, for example sunflower oil (in Dutch called "zonnebloem olie") has a refractive index of 1.47. Which is the same refractive index as borosilicate glass. This means that when you submerge borosilicate glass into vegetable oil, you won't get any reflections of the surface of the glass and the light that passes through it doesn't seem to bend. If you were to stick an magnifying glass made out of borosilicate glass into this fluid, it will no longer have magnifying properties, simply because the light passing through it doesn't see a difference in refraction and therefore doesn't bend. Essentially, you wouldn't even be able to see it any more. Well... if you look closely you'll still see something because nothing is perfect. To make a long story short, when you submerge borosilicate glass into vegetable oil, it disappears (well not really, you just don't see it any more). Regular glass (soda-lime) has a slightly different refractive index and therefore does not become invisible when submerged into the oil.
|

|
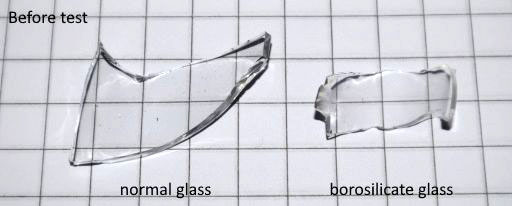
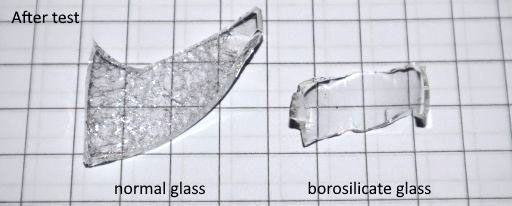
A simple test with two pieces of solid glass. On the left=soda-lime glass a.k.a. normal glass, on the right=borosilicate glass. When submerged the right piece of glass is hardly visible while the left can be easily seen. Now if you still wonder if you did everything correct, you might want to do another test to confirm that you have indeed borosilicate glass. The heat stress test can give you this definitive answer. Heat the glass for 60 seconds in a blue flame and then cool it down immediately by submerging it into a cup of cold water. Since regular glass is not able to handle this rapid cooling it will crackle due to the internal stress. However (because of it's much lower thermal expansion properties) borosilicate glass does not have these problem and will look completely fine. Below two images, one before the stress test and the other after. It now goes without a doubt, that the normal glass is damaged and the borosilicate glass is still fine. |


|
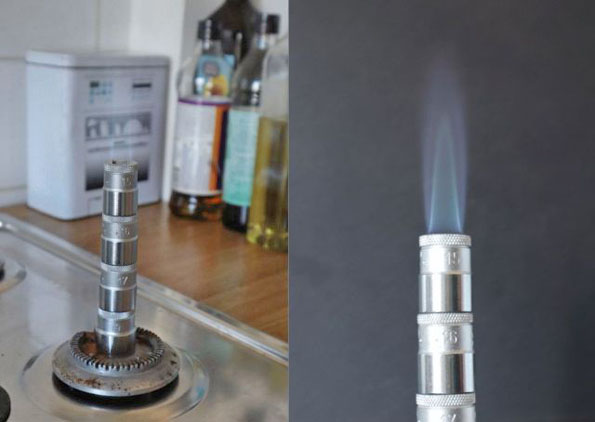
Tip: If you have trouble finding a shop that sells you very thin (1mm or less) borosilicate glass rods then you need to go the alternative way, which might be buying borosilicate test tubes, these are relatively cheap and are sold in laboratory equipment related (web)shops. A good shop always mentions the exact material of which the tubes are made of, this way you know that you buy the good stuff. Then when you got the tubes (which are most likely shipped in a box with much of foam and bubble wrap plastic to prevent damage during transport) put a tube in a paper/plastic bag, put on your safety gloves and glasses and gently hit the bag with a hammer. Most likely nothing will happen, so hit it again but harder, until the tube breaks, then stop hitting it, we need shards not dust. Now choose the longest, but thinnest, shard of glass and that's what you'll be using for making the stylus. Because of the high melting point of borosilicate glass, you'll need thin pieces which are easier to work with. Making a "stylus" from a drop of glass Now that you know which glass to use and how to recognize it, you can start to form it into the stylus shape required. In other words, what we'll need is a tiny stick of glass of which one end will have a perfectly rounded (droplet) shape. Regarding the size of the droplet, there is lot's of confusion. The book "the compleat talking machine" by Eric L. Reiss, mentions a drop size of 0.7 - 1.0 mm (0.027 - 0.038"), this is much larger than mentioned by Henri Chamoux who mentions a size of 0.2 - 0.4 mm, which is significantly smaller! Although there seems to be an explanation for that smaller size, as Chamoux mentions that "Old phonographs had glass or sapphire styli of a diameter of 0.8 mm. But this size was meant for heavy phonograph tone arms. I have discovered that the best diameters range from 0.2 to 0.4 mm depending on the type of cylinders: engraved or moulded, brand new or scratchy." Now light or heavy are not very clear descriptions as I do not know if my reproducer will fall into the "heavy" category, but what I do know is that a smaller stylus diameter has a much easier job of following the track, simply because it's smaller diameter allows it to sink further into the groove. Therefore the larger diameter stylus is more prone to skipping or skating. But what I also know is that the smaller diameter stylus is more likely to damage the cyclinder groove. This because a smaller diameter stylus concentrates the weight of the reproducer onto a smaller surface area and therefore effectively applies a greater force onto the groove of the cyclinder increasing the risk of wear. So, to keep on the safe side, I'll be rejecting anything smaller than 0,6mm. This is also an acceptable size which you will be able to make and measure using simple tools. Do not expect your first attempt to be succesful, just make a few and select the best when your done. But I can assure you, making a small stylus isn't as easy as it seems. Measuring the size of the droplet can be done with a vernier caliper but a micrometer is to be preferred. And thanks to the internet you'll be able to find a decent micrometer for less than 10 € (including shipment). So, I considered this all to be a nice excuse to buy me such a micrometer, which makes these kind of measurents a bit easier. Because of the higher melting point of borosilicate glass you WILL experience problems when melting large chunks in a simple flame. The solution is simple, either buy a better torch (gas+oxygen). For many of us a better torch isn't an option, then only way to succes is to use the smallest, thinnest, piece of glass possible. You might want to experiment in order to find your limitations and work your way up from there. This way you can get a feeling about what is practical for your setup. This is very important, because it can be very frustrating when your glass just won't melt. But as long as the piece of glass is thin enough you will be able to get the job done with minimal effort using nothing but a simple torch or Bunsen burner. Patience is the key to succes. Converting the kitchen stove into a Bunsen burner If you don't have a blowtorch but do have a kitchen stove that works on gas then you might consider making an improvised Bunsen burner. Technically a stove isn't all that different. In both cases the gas flows into a mixing chamber and where the mixed gas exits, it will burn. So basically the stove already is a sort of bunsen burner but with multiple flames and a much flatter mixing chamber, the major difference is that the stove has no way to regulate the air intake. Which is a good thing for a stove. But the major drawback of a stove (for our purpose) is the shape of the flame, all those tiny flames are useless if you want to hold something large directly into these flames. The trick below essentially combines all those tiny flames into a single much more usable flame... useful for our experiment that is. This is how you can "convert" your stove. First remove all the unwanted items from the stove to create a clean workspace. Then remove the metal plate from the medium size burner. By removing the metal top plate, you have just disassembled the gas/air mixing chamber. So now we'll build a new mixing chamber, using four pieces from a socket wrench set (15,16,17 and 19mm). We really need a tall mixing chamber in order to achieve a decent mixing of the gas and air. However, your stove might require a different configuration as this also depend on the size of the burners and the amount of gas it will be able to deliver. In other words, different stoves might require different sockets. Stack the sockets on top of each other, the largest at the bottom and the smallest one on top. You may now gently open up the gas and light the flame that comes out the top socket. It is important that the sockets are stacked without gaps and that they are stable! Use the stove gas regulator to change the size of the flame. Because this isn't a real bunsen burner, you can't regulate the mixture. But honestly, you don't really need to do that because the nice people who designed the burners of the stove already designed the air intake holes already as efficient as possible, adding more holes to let more air in doesn't help.
|

|
ATTENTION: This setup may seem easy and may seem like fun, but it is not a toy! It is a serious burner and should be treated as such. Wear protective clothing and eye protection just as you would do in a lab. If you are not trained/skilled enough to operate a bunsen burner (or stove), then you are not ready for this part of the project. Buy a decent burner or ask a skilled friend or technician for help and advise. Keep in mind that this flame is not to be compared with the normal flame coming from your stove as it is considerably larger! Always keep an appropriate safe distance during ignition and use. Any fire, no matter its size, is dangerous! It's always hot and has the potential to set your eyebrowse, hair, clothes, house or neighbourhood on fire. So when using this it's just like working with any other kind of torch, wear goggles, gloves, non combustable clothing and remember anything you've put into the fire will remain hot for a long time! Also the top socket will remain hot for a short while after use, so be careful with disassembly. Allow things to cool down. |

| Write to Jan Derogee: | Visit Jan Derogee's site: | |
