Version: February 19, 2000
|
|
Version: February 19, 2000 |
by Brian Carusella
|
|
This is based on an article written in 1977 by Donald W. Matteson, and published by the Edison Institute. It works much like Edison's original recorder, using metal foil to store the audio information. One piece 1/4" x 2" x 12" plywood and 1 piece 3/4" x 10" x 36" piece of clear white pine will provide enough wood for all pieces listed below. This is from an article which did not include metric measurements. I will add them as time allows. You will need:
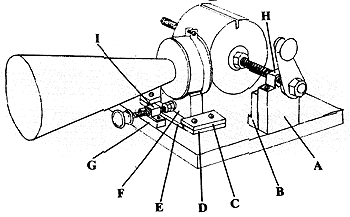
Cylinder
Cylinder Cut 4" circles from each of the 5 square wood pieces. Drill 1/2" hole in center of each. Glue together, keeping the hole free of glue. Once dry, cut 3/8" from one end of cylinder, so it is app. 3 3/8" long. Place nut and washer 3 3/4" from end of threaded shaft. Put cylinder on other end. Lock in place with second washer and nut. Make sure cylinder is as nearly perfectly round as possible. Cut a lengthwise slot on cylinder 1/8" deep x 3/32" wide. |
|
Recorder / Reproducer (RR)
Remove top and bottom of can. Cut down to app. 1 1/2". Cut mica or plastic to fit can opening, marking center w/compass. Epoxy to one end of can. Enlarge compass hole and screw in #4 screw for needle. Cover other end of can w/ circle of cardboard, which in turn has 3/4" hole cut in it. Make manila paper horn, 8" long, 4" one opening, 3/4" the other, and glue into hole in cardboard. |
|
Mounting
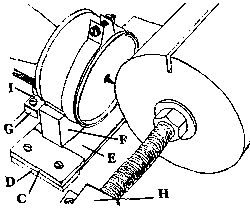
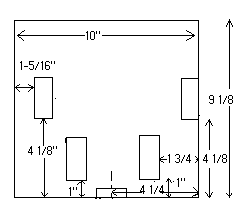
Glue one A block to base, flush w/ one side of base (right side in the drawing) and 4 1/8" from front of base (2" side on base). Glue one block B to base and inside wall of A (2" side of B on base as well, so B is "L" shaped). Repeat on opposite side of base with other A & B so that the outsides of the "A" pieces are 8 11/16" apart (second "A" will not be flush with base side). All blocks should be 4 1/8" from front. Lay E on base. Lay F on E (2" side down) 9/16 from front of E and centered side to side. Hold can rim of RR (centered side to side) on front side of F so that the needle is 2 1/2" above the base. Trace position of can on F and cut out semi-circle. The RR can should fit the cradle in F. Glue F onto E, leaving 1/4" on each side and 9/16" on front. Clamp and dry. |
|
Slider / Guides
Place one D block 1" from front of base, 1 3/4" from flush support side of base. Place EF immediately to the left of D (touching) and place the other D block snugly against and to the immediate left of EF, 1" from front of base. Both D blocks should be parallel. Glue both D blocks into position. Add one C block to the top of D, flush w/outside of D and overlapping EF base. Repeat on other side. Drill 2 holes each in C, 3/8" from outer edges and 3/8" from each end. Screw in #6 screws. Glue G to front edge of base, centered in front of EF. Slide on washer and screw 3 nuts halfway down 1/4" shaft. Rest final nut on G. Locate and drill 1/4" hole into F so that threaded shaft is parallel to base and perpendicular to EF when threaded through the hole. Place shaft through F and place washer and 2 nuts on the end that sticks through F. Outermost nut should be flush with end of shaft. Tighten inner nuts on either side of F, but not so tightly that shaft will not turn. Tighten outer 2 nuts against inner. |
|
Final Place 1 nut on each end of the 1/2" shaft. Put shaft and cylinder on A blocks so the nuts rest on the A blocks. Take H and bend as below (make 2); do the same with I (only one).
          7/8"                 1/2"
          _____               _____
  5/8"-> |    | H    7/16"->  |    | I
       __|    |__           __|    |__
               1/2"                1/2"
Drill holes in the center of both tabs of H and I to accept screws. Put H braces over nuts in cylinder shaft on both A blocks. Screw down. Nuts should not move. Attach I to G in same manner, placing bracket over 1/4" nut resting on G. Put a drawer knob on the end of the 1/4" shaft. A hand crank will need be designed for the end of the cylinder shaft, using sheet metal, nuts, and a drawer knob. Mount RR to E/F assembly using epoxy or a sheet metal bracket of your own design. Cut felt to fit cylinder, leaving slot open, and glue in place.
Recording Cut a sheet of tinfoil 3 to 3 1/4" wide by13" long. Put one end in the slot of the cylinder and wrap, smoothing as you go. Put loose end in slot and secure with part of a wire coat hanger or cardboard wedge. The foil should be tight and smooth. Turn the crank to move the cylinder all the way to one end. Turn the RR screw until the needle just touches the foil. Turn the crank and adjust until the needle begins to form a slight groove on the foil. The crank should be turned at a uniform speed (65-70 rpm is the ideal, moving the cylinder the length of the shaft in about 30 seconds). You will want to practice so you can record and play back at the same speed. When recording, speak in a very loud and clear voice into the horn.
Playback After recording, back the RR needle away from the foil. Rewind the cylinder to its original position. Advance the needle so it is not quite so deep as for the recording and turn the crank at the same rate as before. You should hear what was recorded through the horn. Adjustments are critical, since the foil can be torn or the recording erased very easily. It will take much trial and error to use it expertly.
AddendumMatt Langille, of Nova Scotia, Canada, wrote to contribute the following tips: "We built your phonograph for a science project. We made it work after many difficulties. Here are a few ideas that may help others:
Thanks, Matt!
Troubleshooting Almost every problem reported had something to do with the recorder/reproducer head. The R/R needs to be firmly mounted to the EF block assembly so that it doesn't slide around. The diaphragm needs to be made of a material rigid enough to vibrate, but not too rigid (Matt Langille's suggestion of a CD cover works nicely). And the needle needs to be adjusted carefully so that it makes a groove in the foil while recording without tearing the foil. It should contact the foil somewhat lighter when reproducing the sound. You will only get this right by much trial and error. |

| Write to Brian Carusella: | Visit Brian Carusella's bizarre site: | |
 |